Sunday, January 13, 2019

Bead roller dies... Print them!

So what if you need a unique die profile that you will only use once? Why not print them!


Today I designed and printed some custom bead roller dies that I will need to fab my tailgate on my F100. It only took numerous tries to both design the right profile, but also to get the print settings right to make a part strong enough to shape metal. Plus, it forces me to learn something new, which is generally a good thing, as long as it's something I want to learn or so my bosses have told me. For me, I will only need those dies once, so it was a better deal to buy an inexpensive 3d printer and get some free software that it would be to have a custom set of dies made. Plus I can make another set relatively quickly if needed to include any new shapes.


The profile shows v11 on it. That is the 11th version (after I started keeping track). I had a profile gauge that I was using, but it could not get tight inside radius accurately, so I ended using the tried and true method of creating a cardboard template and then making the digital version to print.

The small circle was the 4th or 5th try to get the inner profile correct for my bead roller shafts.


The two profiles are to create the body side profile on my truck to extend on to the tailgate I have envisioned.

I used the Creality Ender 3D pro with Hatchbox white PLA to print my dies.

Tuesday, December 12, 2017

Raising the bed floor 2 inches

So I have begun to do the work to raise the bed floor two inches. The original bed floor and wheel wells had suffered a truck's life and needed to be replaced.  Not to mention at some point in the trucks life it had a tool box in it and to make it fit they had bashed the wheel wells in to make it fit.

I started by removing the bed floor and wheel wells and then set about fitting some 16 gauge steel trailer fenders.  The bed floor will be replaced with Auto Metal Direct panels.  Basically I got some two inch square tubing and welded a length across the front of the bed on top of the original cross member and across the back.

Below are some pics of the progress so far.  I got the bed braced up before I got all the big pieces out  of the way and have begun to mock up the new wheel wells.  They will be widened several inched to accommodate a much larger tire and wheel combo.


I will add more pics as I progress through this portion of the project.  Enjoy!


Tuesday, October 3, 2017

Outer cab corner finished!

So here it is finished... Not the easiest thing I have done, nor the nicest. But it is all steel and fairly close the passenger side.

Sunday, August 27, 2017

Outer cab corner repairs

So I got off to an early start this morning and decided to fix the passenger side outer cab corner... the easy one!

This is after I had fixed the inner cab corner.  Some time with card board to make some templates and then a little simple bead rolling got it looking like new.  Unfortunately my welder died during this and that's why it looks like unfinished welds on the right side.


Three months later I got my welder back and it seems to be working like new.  I decided do this repair using several pieces because I don't have the skills to make in a single piece.  I tried to hammer form the corner in  one piece and it took quite a bit of time and effort to see that I still need to work on these skills.


Here is it finished.


I started on the drivers side also... I knew this one was going to be significantly more difficult because it had more damage.

I got part of it done using the same techniques I used on the passenger side.


Neither side is perfect, but is all metal.

I still have the actual corner piece left on the drivers side and I be working on that soon.

Have a good one!


Wednesday, May 31, 2017

Drivers side inner Cab Corner repair

So here is where I started.


I cut out all the rusted metal back into the good metal a little ways both inside and out and this was what was left, for now...


Right now I am just working on the inner cab corners and these are the easy ones comparatively.

I made a template on some poster board to include the channels on the back that I am guessing are drains.


I cut some cold rolled 18 gauge steel to match my template although just a little larger to make a precise fit.


I used my bead roller with the 1/8" step dies to create the channels.  Below is a rusted piece that I used to see
where they went.  Turned out well I think.


Here is my bead roller.  It started life as HF unit I got with a 25% coupon.  I have modified it to strengthen it.  The single biggest change that was made for the better was getting rid of the hand crank that came with it and put the wheel on it.  The wheel was the bottom off an old chair.  It makes rolling a pattern so much easier.


Here is the easy part of the inner fender.  I also fininshed the other half, but don't have any pics right now.  I'll add it later.


Here is the inner completed.


Have a good one!


Friday, February 17, 2017

1960 F100 Radiator Support

So I completely disassembled my front clip and from what I could see when it was on the truck it looked good. I was really hoping that the radiator support was in good shape too. I was wrong!

Here are some pics once I got it removed.  Great googly moogly!


I removed the bottom in order to clean out the rust and check the sheet metal.  It was good with just surface rust, so I cleaned it, coated it with a rust preventative spray and then painted it inside and out. I prefer VHT products, both their Rust Converter and Roll bar and Chassis Paint.


Before anything was taken apart, I made templates out of card board for the missing/rusted pieces and cut them out of 18 gauge steel.


I removed a the two horizontal braces because the radiator I plan on using was a little wider that the original radiator and would not fit.  So I have about a dozen small holes to fill on each side.

Repairing rust is dirty work, but it must be done!  There were parts of the support that had what looked to be some type of coating on it.  The only way to get it off was to scrape it off with a scraper / single edge razor.

I'll post a few more sometime later.  It is currently mocked up on the truck right now.

I love my Fabricator 211i welder!  It makes me a better welder and I need all the help I can get!

But a quote by AvE (ArduinoversersEvil) on YouTube sums it up!  "A grinder and paint, makes me the welder I ain't!"


Monday, August 22, 2016

Got the engine running...

for a little more motivation. It was idling a bit high in this video.  Still have some tuning to do.


Sounds pretty nice...  Trick Flow Specialties Stage 1 through JBA headers, Magnaflow X-pipe and Thrush welded mufflers.


Saturday, September 26, 2015

Needed some motivation...

So I put the body back on the frame to get a feel for how it looked.


I think it looks great, it has the stance I was going for. This got me pumped up to go and start working on some other stuff.  I ended up removing the triangulated four link and went back with leafs.  The packaging of the setup in the frame wasn't quite right so I reverted back.  So to keep the truck behaving properly, I will build a torque arm for it.  I already got some of the pieces I needed to start.

I got a Currie Johnny Joint for the front of the arm where it will attach to a shackle. I also got a few high misalignment spacers. These will allow the joint to take up the movement of rear axle without binding as it articulates, plus I get the added benefit of them reducing the diameter of the rod end from 3/4" to 1/2". I also picked up some threaded rod ends and some universal threaded rod end bushings. I'll post some pics once I get the DOM tubing to build it.

Wednesday, August 20, 2014

Front clip mock up with new wheels and tires

Here is the front end mocked up with B/G Rod Works Gasser Gun Metal Wheel in 5x4 3/4 bolt pattern with 225/55-17 General Altimax tires.  The front end has the springs out to get ready for air bags, but I have blocks of wood in place to hold it at ride height.


I haven't mocked up the rear yet, but they will be 255/60-17 General Altimax tires as well on the same 17X8 B/G Rod Works Gasser Gun Metal Wheels.  I will need to get new axles with the correct bolt pattern and then I can mount the rear disc brake conversion kit and the wheels.  My hope is that it will have a slight rake if my calculation are correct and look nice when the air is out.

Monday, July 7, 2014

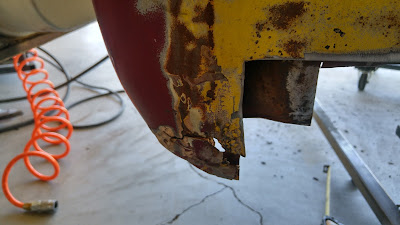
Here is some images of the front cab corner / cab brace rot

Here are some of the pic of the drivers side front. This one was easily the worst of the two.


Here is the Passenger side...not as bad.


Here is the fuel filler.  I plan to weld in a piece for this.


Here is a hole in the upper driver's side of the bed.  It looks like it could have been for an antenna, or possibly a fuel tank in the bed.  (there was a fuel diverter valve in the cab.)

Here are the rear cab corners... again the drivers side is the worst by far. I think the damage was compounded by a failed repair attempt via duct tape and fiber glass.


I have one more small piece of the passenger side floor to replace and then I'll get some more pics of the repair posted.

Til next time.